Skype instructions for test users
Some user tests are carried out via Skype. Here is a step-by-step guide to using Skype.
PREPARATION
Please ensure that everything is set up before the meeting starts. Refer to your confirmation email to see which device is used for performing the user test and then set up Skype on this device. Although this is very easy, it may take a few minutes the first time you do it. Please allow enough time for this.

How to download Skype
1. Download
Click here to download Skype free of charge onto your computer or smartphone.
2. Create an account
After the download, you will be asked to create a Skype ID or account. To do this, enter your email address and a password. You also have the option of adding a photo. You then have the option of testing the sound and image quality. You can also add contacts already, although this is also possible later on. You’re now logged in!

How to make a Test call
3. Is my microphone working?
Please take some time to test your connection before the study. To check whether your microphone is working properly in Skype, you can make a test call. To do this, click on “Contacts” and dial the Skype wizard “Echo/Sound Test Service”. When you call it, you will be asked to record a message and to play it back to yourself – this is how you know whether your sound is working properly.

How to start a call
4. Add contact
Click on “Contacts”, then “New Contact”. Now enter the Skype name, email or name of your contact person. Then click “Add”.
5. Activate recognizability
To allow your contact person to find you, please make sure that your “Visibility” is activated. To do this, go to the Skype settings and under “Account & Profile” click on “Your Account”. A browser window appears with your Skype profile settings. Please place a checkmark next to “Visibility”.
6. Start the call
From your contact bar, select the person you want to call. Then click on the video camera icon for a video call, or on the handset for a telephone call.
Screen sharing
What is it and how does it work?
Most tests will ask you to share your screen. You will find this information in your confirmation email. The test coordinator will send you a link via chat with which you can open a product prototype. When your screen is shared, your contact person can follow how you interact with the product.

Computer
Click on the screen sharing button, circled in red.
Requirements for your device to be able to share the screen:
Linux, Mac, Windows, Web and Skype for Windows 10 (version 14).
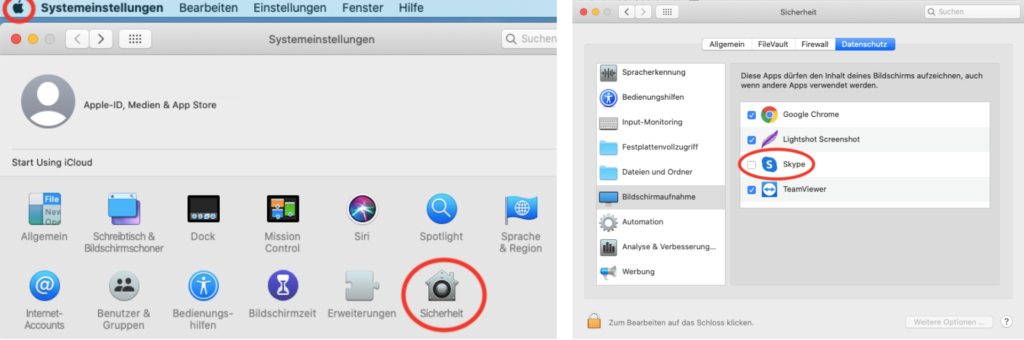
Caution with the latest Mac operating system
Skype requires access to the screen capture function in the Mac system settings. You will either see a Skype notification that takes you straight to the settings, or you will have to grant Skype access yourself in the system settings. To do this, switch to “Security” > “Screen Capture” in the Mac system settings and grant Skype access.

Smartphone/tablet
First click on the three-point icon, then on this button.
Requirements for your device to be able to share the screen:
Android (6.0+), iPhone 6s and later, iPad Air 2, iPad mini 2019, newer devices with iOS12 and later.
Any questions?
Test new products and services: Share your opinion & get paid for it.
YOU’RE NOT EARNING MONEY AS A TESTER YET?