Qualitative research methods have experienced a marked upswing in recent years. These methods are popular because they are usually easy to implement and show us why users perform particular actions.
The most common qualitative methods are probably psychological interviews or task-specific interviews. In these interviews, participants are either asked their opinion directly, or they are told to try to accomplish a certain task and think out loud while they do it. The interviewer can then, if necessary, ask questions or go into further detail at points that are of particular interest.
It is usually difficult to evaluate qualitative methods like these. The data is unstructured and the interviews are seldom directly comparable, as each one is somewhat different and affected by each respondent’s personal background. In this article, I would like to introduce you to a method that will let you structure your data by themes, make it searchable, and help you collaborate with your colleagues during the research process. I am talking about tagging. I know that tagging has the reputation of being old-fashioned and complex. But new software solutions have made it a doddle to use today.
In this article, I will show you how you can use tags to:
- Add more structure to your research.
- Identify hidden insights from your data and avoid bias.
- Substantiate decisions and insights gleaned from data-driven qualitative studies.
- Create your own repository of insights and research findings, enabling you to make use of these insights in the long term.
Which methods are particularly well-suited to tagging?
So, how can we set off on our tagging adventure? First of all, we have to conduct research and gather data. Tagging is especially worthwhile for methods (and data sources) that usually produce unstructured data, such as:
- Interviews
- Usability tests
- Feedback channels (emails, chats, service calls)
- Free-text fields in questionnaires
Let’s assume that we’ve undertaken a standard face-to-face interview with a participant. The tagging itself can also be easily transferred to other data sources such as open-ended questions in a questionnaire and free-text fields in an NPS survey, as well as feedback from forums or product rating platforms. But for now, we’ll stick with the idea of a standard interview.
Side note: Why it’s worthwhile making a transcript
The dangers of note-taking
I know making a transcript can be expensive and/or time-consuming, but I’d still like to briefly discuss the value of a clean transcript in the context of qualitative research.
During an interview, the researcher often not only has to conduct the conversation: they also have to make notes for subsequent analysis. Even the most adept multi-tasker will have problems being attentive enough during the interview, while also reacting to subliminal signals given off by the interviewee and noting every single conspicuous feature of importance.
In the ideal scenario, you will carry out the interview in pairs, so that one person can concentrate on the conversation and the other on note-taking. After the interview has been concluded, the notes are reviewed and merged into a report.
Confirmation bias and note-taking
Reports based on notes are often tinged with “gut feeling.” Usually, a clear direction begins to crystallize after a few interviews, and the researcher writes further notes with this thought in mind. This effect, also known as confirmation bias, leads to other important insights being rather overlooked or, in the worst case, to the wrong conclusions being drawn.
A transcript to the rescue
A transcript can help you to structure your research, go through everything again in peace, and search for patterns and themes.
Creating the transcript yourself will take five to ten times the length of the interview. So, if you’re planning to create transcripts more often in the near future, it’s worth investing in appropriate software and a “foot pedal.” This will save you a lot of time (and stress).
If you prefer to outsource the work, there are plenty of online services that will provide you with transcripts for between €1 – €7 per minute, depending on how quickly you need the transcripts or how complicated the transcription is (due to language, dialect, or audio quality).
By now, there is also a plethora of AI solutions that automatically create a transcript, including multiple languages and speaker diarization. Usually, this takes no longer than the length of the interview. However, you should plan time for checking and correcting the transcripts, depending on the audio quality of the recording. That said, this option comes at the lowest price.
At the end of the day, it’s always a question of striking a balance between speed, price, and quality. You probably don’t need a transcript if you’ve just asked a few colleagues some questions. But if you’re doing a long-planned study to draw conclusions that are important to the business, it’s definitely worth investing in a transcript.
Getting ready to start tagging
What are tags, anyway?
Tagging is a process which sees various pieces of content be assigned to a specific keyword. You can often see it used underneath online articles or blog posts, where the tags help users find related articles and learn more about a certain topic.

The same is true for tagging when used to analyze qualitative data, but the difference is that this version of tagging aims to be much more precise. In the blog example, the whole text is usually covered by the tag “card-sorting” but we want to be more specific for our interviews, only tagging certain parts of the text. This means that tags can overlap or several tags can be applied to the same area.
What is actually tagged?
We’ve talked a lot about tagging specific parts of the text, but what exactly is meant by that? First of all, the purpose behind tagging your transcripts is to draw conclusions from your research.
Tagging the most important parts of your data provides you with structured results.
The most important thing about tagging is consistency.
I’ve always worked through transcripts by tagging a whole sentence each time. If, for example, a sentence contains a positive statement, I mark the entire sentence with the tag “positive.” My thinking behind this was that, if a user often makes negative (or positive) statements, then this should be more important later in the analysis. If the participant makes statement after statement, every statement gets tagged individually. The important thing is to remain consistent and not to mark partial sentences or certain words.
Examining whole sentences can also lead to problems, as participants in user tests rarely speak in grammatically correct sentences. We usually don’t notice this when we’re speaking, but reading a transcript quickly reveals what a mess a normal conversation can be. This introduces challenges when tagging. Let’s take the following example:
“I didn’t like the registration. I don’t like that. I just think it’s stupid when I’m asked for a credit card number here.”
If we now tag each sentence, the whole thing could look like this:
![]()
The user’s statement is thus assigned three negative tags. Another user may be able to express himself better and put everything in one sentence. By the way, it is, of course, up to the author to decide whether to separate a statement with a comma or start a new sentence in the transcript itself.
Meaning units
To counteract this, we can divide the text into something known as “meaning units.” A meaning unit is a statement, a sentence, or a coherent sequence of sentences that all describe the same idea or statement. Our example could be summarized as an independent meaning unit since all the sentences refer to the fact that the user does not want to enter their credit card details when registering.
An easy way to follow this approach is to divide your transcript into paragraphs for each meaning unit. Afterwards, you can simply tag these paragraphs one by one. This could look something like this:

Each paragraph has its own theme, no matter how many sentences it contains. Here, too, there is a chance that everyone could define a meaning unit somewhat differently. As a result, it is best to talk to your research colleagues about the research at regular intervals to ensure that you’re all on the same page in terms of the tags and the meaning units.
You’ve done the research, prepared your data, and are ready to start tagging. In the next section, you will learn how to create your own tag taxonomy and how to generate insights for your research.
How to choose tags for your research
Which tags do I need?
Choosing tags represents the most important part of the analysis. It determines how well you can analyze your data, how well your colleagues and stakeholders can understand your analysis, and how you can build long-term knowledge within your company. But whatever tags you choose, you’ve got to be consistent.
The first step is dividing the tags into categories, to ensure that you don’t miss anything and can keep an eye on the whole project. The following categories are a good start for usability testing.
Workflow tags
Workflow tags are tags that define the context. What task is the respondent undertaking, and what goal are they pursuing? If you have given your respondent individual tasks during your test, enter them as tags here.
Examples: create account, close purchase, product search.
In addition, hypotheses that you have made before you started your research also belong here. This means that you can easily tag passages concerning your hypothesis and gain a holistic overview later on.
Journey tags
Journey tags give you information about where the respondent is at the moment or which device the observation occurred on.
Examples: login page, pricing page, profile view.
To avoid an excessive number of tags for complex products, it can help to specify individual stations or areas of the customer journey as tags.
Sentiment tags
Sentiment tags are about how your respondent feels. You should also try not to assign too many tags for this.
Examples: positive, negative, confused, angry.
General tags
General tags provide general information about a user. A user might say something about their experience with software so far or suggest how something could be done better.
Examples: suggestion for improvement, user behavior, target group background.
But as always, different products and tests require different tags. Dividing tags into these four groups is only a way to help you find your feet at the beginning. You are welcome to deviate from this pattern if your product or objective requires it.
How can I decide on specific tags?
In general, there are two ways you can choose your tags.
Deductive
Here, you start thinking about your tags even before you’ve seen your data, and ideally, before you start doing interviews. You can even define hypotheses as tags or think about topics to structure your research.
Inductive
The tags develop as you work through your texts. Using software to assist you is beneficial if you select this option. Make sure that tags can be easily created from the text and that you can merge them later if required.
In practice, of course, people usually use a mixture of both. It’s worth thinking about hypotheses beforehand and creating some tags. You can also usually work out the journey tags before testing starts.
During testing, the tags usually develop to reflect the moods and emotions of the test subjects or insights into the general behavior of the target groups. Don’t be shy. In the early stages of your research, it is completely acceptable to create additional tags if you’re using a software solution for your tags. Usually, these tools allow you to merge the tags afterwards. This is useful if you later come to the conclusion that two tags are very similar to each other.
Example tag collections
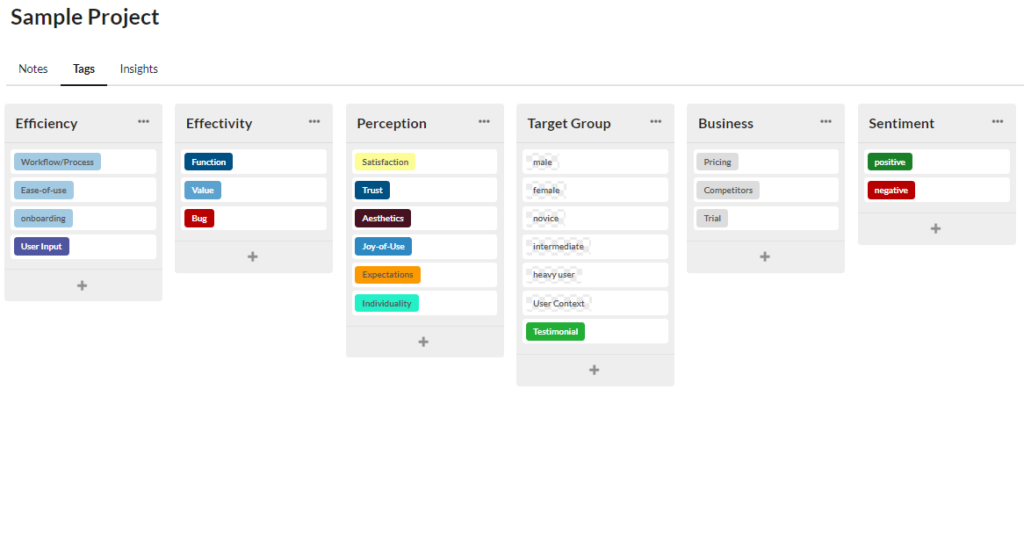
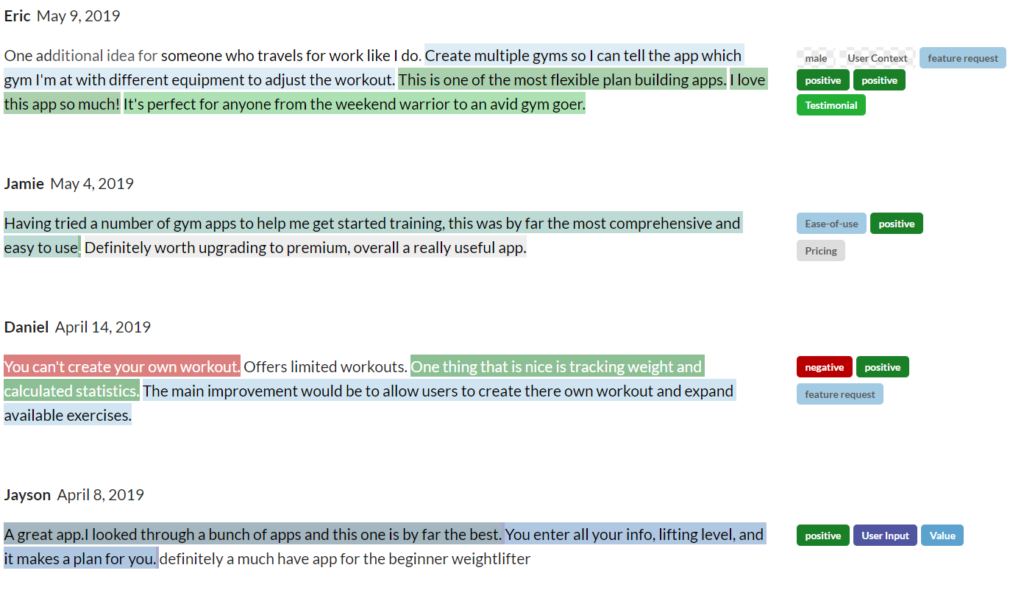
This example shows tag feedback channels like support emails or product reviews. As a result, the tags focus on efficiency and effectiveness, as well as perception. In addition, hypotheses were not used since they were not explicitly tried out in a test: feedback was tagged by users instead.
Tagging feedback channels is particularly difficult because this data is even less structured than the data generated by an interview. In addition, we usually know little about the user or the context in which the feedback was given.
However, if you have already analyzed your feedback and identified certain topics and problem areas, you can create these as tags and collect further data on them or learn more about the cause of these problems.

Here, the additional category “difficulty” was introduced for tags: since this project was a non-digital product, test subjects were to state how easy they found the handling to be.

Tagging in action
Once the tags have been created, go through the text and look at your individual meaning units, then give them all tags that fit. You can, and should, assign more than one tag to a meaning unit.
![]()
In this example, we tagged which task the user had, which page they were on, which emotion they felt and to which hypothesis this statement belongs. The more tags you apply, the more granular your analysis will be.

In this example, individual records were tagged. As you can see, a document can quickly become confusing, with lots of different colors and tags. This is normally not an issue since we will only look at the individual tagged text snippets during the analysis stage.
The analysis
Now we’re finished with the bulk of the work and can finally start the analysis. For this, it’s an advantage if we used suitable software for tagging the document. Because this can save us a lot of work during the analysis.
First of all, we can look at the obvious topics and hypothesis tags. Ideally, we’d be able to select some at this stage and write out interesting text passages right away. If, for example, a meaning unit is tagged with a hypothesis tag and a negative sentiment at the same time, this indicates that our hypothesis is perceived negatively.
Generally speaking, you can play around with the data here. For example, how many negative tags were there on the login page? Or which general insights can be found about the target group? Which patterns are created by the negative tags?
Making insights usable in the long run
From tag to insight
The great thing about tagging is that it doesn’t just help with the analysis. With some advance planning, it can also be used as an “insights and research library.”
Linking insights with tagged text makes your research findings automatically traceable. This generates knowledge that can also be used for future studies.
Imagine the following scenario: a colleague of yours also wants to do a study. It’s now easy for them to see what has already been written in other tests for the tags that match their study.
Or a colleague is so enthusiastic about one of your insights that they want to continue the research in this field. By linking tags and insights, they can now simply look at the raw data to see what was dealt with in the study at that time and thus adopt best practices in their own work.
Although it’s easy just to ask your colleagues if you’re based in a small research team, it is increasingly important that growing UX teams document their research and insights for their colleagues and avoid the construction of knowledge silos. A common basis for tags can act as the foundation for this. This ensures that you perform your evaluations on the same basis, making your research comparable, searchable, and thus findable. After all, the best insights are the ones that you share with everybody.
Global tags
You also need global tags for the study itself, so that you can keep an overview of what’s going on, even in larger datasets. These then correspond to the blog example at the very beginning of this post, meaning that we tag the study as a whole. The most important bits of information you’ll want to include are:
- Which method(s) was (were) used?
- Which product or which target group was part of the test?
- Contact person or person responsible for the research
Get the most out of your user research
As a user researcher, you’re confronted with a large amount of data every day. So, you have to try to bring structure to transcripts and other research data. All this requires a lot of work, perseverance, and discipline.
Tagging helps you to structure and evaluate your qualitative research in line with clear rules. This does not only make collaboration easier (if the rules are clear, a colleague can help you with the tagging): it also makes the data more traceable. This way you can support decisions effectively because you can see precisely how often certain statements occur in your research.
Today, there are lots of tools that can help you with the tagging process, thus making you more efficient once you’ve got the hang of it. These tools help with the tagging process and also assist you to share your insights with colleagues and build a user research repository that can be used in the long term.
Over time, you’ll also discover that you’ve put together an extensive collection of insights that can be easily linked and expanded thanks to the tags. This means that your studies and UX tests are no longer individual completed units. Instead, they have become part of a constantly growing system.
Join the conversation
During the research for this blog post, I also noticed how little research is currently being devoted to this topic. Since the topic is becoming increasingly important as research becomes operationalized, there are now online communities like ReOps that try to compile best practices and develop them further.
Everything I’ve written about this topic primarily draws on experience I’ve gained through my own projects. You might not be able to transfer everything directly to your research. But I am looking forward to discussing the challenges you face. I’m also curious to hear about your experiences and approaches to using tags within your context.

