
Nowadays there is a vast amount of different design processes and methods available in the market. Moderated user tests are one of the most effective methods. The most famous evangelist for usability testing is Jakob Nielsen. He proofed with one of his studies, that only 5 test users are required to uncover 75% of usability problems in a given test object. User testing is not rocket science. All it takes is a good amount of curiosity and a lot of practice. Good listening and sharp observation is the key to successful user testing. This white paper discusses, step by step, how potential usability weaknesses in digital products (websites, apps, etc.) can be identified using moderated user testing. This guideline is intended as a refresher for UX professionals and for people who have some experience with user testing in an agile environment.
Table of contents
Continue reading online or download the eBook as a PDF:
Preparing a user test
Thorough preparation is required to generate as much useful data as possible from a user test. For example, the product’s target audience should be clearly defined from the start. To this end, personas and scenarios should be developed in advance. Both these tools help the project team throughout the entire implementation phase to arrive at a common understanding about the end user’s essential requirements.
Define the objective
The form and scope of a test depends on the objective. The procedure differs greatly depending on whether an existing site is to be tested due to a planned redesign, the usability of a new function is to be put through its paces, or a manager wants to see convincing evidence by way of a user test. The first order of business for any user test is thus to define its objective: What, exactly, needs to be accomplished? All subsequent steps and decisions can be derived from the defined objective.
Prepare the test object
The core of every user test is the test object. The test object’s stage of completion should correspond to the objective and the current state of the project.
Lo-fidelity prototypes
These are most often used at the beginning of a project. Lo-fidelity test objects are paper or initial interactive prototypes and are primarily used to test the validity of a concept or idea. To this end, the prototype should be kept as basic as possible. In other words, it should not have any hi-fidelity elements (visual design, unnecessary effects, etc.). This is the only way to ensure that the test user responds solely to the basics, and not to the aesthetics (e.g. “I don’t like this button”).
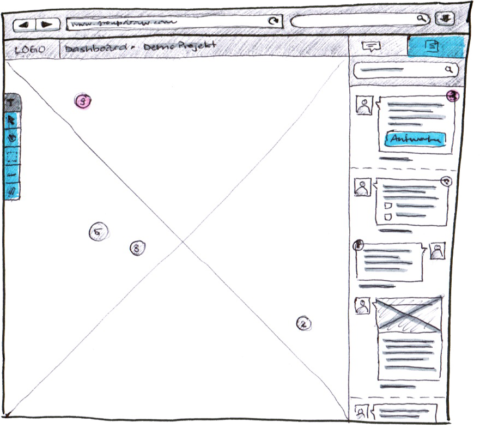
Paper Prototype
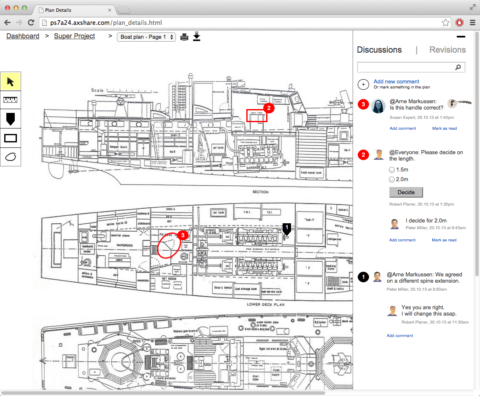
Interactive Prototype
Hi-fidelity prototypes
These are finished websites, apps or pixel-perfect visual designs. The more mature a prototype is, the less pure test user’s response to the basic content will be. In contrast to lo-fidelity prototypes, user tests in this case yield helpful feedback on the visual aspects of the object.
To clearly establish the context for the test user, in both cases it is important that the test object emulate its intended functionality as realistically as possible. This could be in the form of an illustration of a mobile phone as the basis for a lo-fidelity prototype, or actual testing of a mobile phone prototype for the hi-fidelity variant.
Select the test method
There are many test methods, and every expert has their preference. Selecting the right method should in the first instance depend on the fidelity (maturity) of the prototype in question. This white paper will examine in-house moderated user tests.
Hallway testing (lo-fi)
A simple and informal method to quickly gather initial feedback. Here one simply asks colleagues at work or people on the street. The test should not last longer than five or ten minutes and just checks whether people understand the concept on a basic level.
In-house user test (lo-fi/hi-fi)
The most common method for identifying potential usability issues. The moderator, test user and observer are most often in the same room. This makes it easier to record metadata such as body language, gestures and facial expressions and include these in the overall assessment.
Remote user test (lo-fi/hi-fi)
This is a site-independent, quick way of testing a website or product. The biggest advantage of using the remote user test method is that the test user is in a familiar environment – which means the stress factor is lowered. The familiar environment helps to identify problems that might otherwise go undiscovered even in a perfectly prepared test setup. A distinction is made between moderated and unmoderated remote tests. The best-known unmoderated service is www.usertesting.com.
Expert review (lo-fi/hi-fi)
Experts can be recruited as a valuable additional resource for identifying potential weaknesses. The resulting data is based on the statistics generated by and the experience of the respective expert. It cannot therefore be said with certainty that the identified points will, in fact, actually be usability problems.
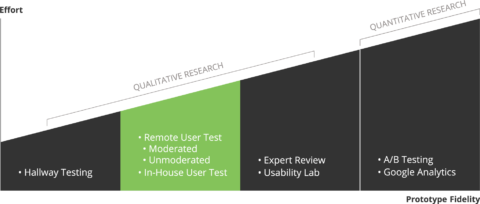
Usability lab (hi-fi)
In most cases a usability lab carries out the entire process for usability tests, including preparation, execution, and evaluation. Assuming that the financial means are available, this sort of collaboration is desirable both at the beginning and end of a project. Potential contacts with a laboratory in Switzerland are Soultank, Ergonomen and e&t.
Quantitative test methods (hi-fi)
For websites, products, or services (e.g. NZZ, Doodle, etc.) that have already been online for some time and have a large number of users, it also makes sense to use quantitative test methods to test a wide range of hypothetical situations. The most common of these methods is A/B testing, in which one half of test users are assigned to version A and the other half to version B of the same product. Which version more effectively achieves the objective is determined by means of a conversion target. Google Analytics provides the infrastructure for A/B tests as well as other functions for carrying out quantitative experiments and analyses.
Drunk test (lo-fi/hi-fi)
This light-hearted method takes an unconventional and humorous approach. The test users test the product while under the influence of alcohol, which encourages uninhibited and authentic responses. The best-known website that conducts drunk tests is www.threesheetsresearch.com (very interesting viewing).
Compose the test script
A typical test script consists of a warm-up, main section and a cool-down. It contains between five and ten tasks, and the test itself usually lasts between 30 to 60 minutes. To make best use of the time and get usable results, a well-structured script is invaluable. It serves as a guideline for the moderator and should not be shown to the test users. The script lists the sequence of tasks to be completed by the test user along with a hypothesis and objective. During the test, the hypothesis helps the moderator to assess the testing purpose of each task. This prevents the moderator from losing track of the test procedure. The predefined test objective helps with the subsequent analysis.
The context of each test is explained to the test user by means of a scenario. A scenario is a description of a situation that helps the test user to approach the initial position as authentically as possible. The questions asked are based on the scenario.
Task assignment
The individual tasks should be formulated as realistically, clearly and briefly as possible. In so doing, particular care should be taken that the questions do not suggest specific responses. This ensures that the test user is not steered in a predetermined direction.
Suggestive: On which sub-page can you find information about the team?
Neutral: Where can you find more information about the people behind this website?
The tasks should follow a logical sequence and, if possible, reflect the natural usage of a typical user. (For example, focus first on the home page and then on sub-pages.)
Warm-up (10% of the time)
The introductory questions should be as simple as possible to ensure that the test user begins with an experience of success.
Possible questions are:
What is your first impression of the page?
What is the first thing you notice?
Main section (70% of the time)
As soon as the test user is warmed up and comfortable with the unfamiliar setting, the actual tasks can begin. A combination of open-ended and specific instructions is useful.
Open-ended instructions (“Buy a pair of suitable sneakers”) are of high interest as we can learn a lot about the user’s behavior and habits of thought (mental models). Open questions can produce unexpected results and valuable data on the user’s general impressions of the product. However, a comparative evaluation is made more difficult as each test user’s reaction can be very different.
Specific instructions (“Buy a pair of Nike Xtreme 300 shoes”), on the other hand, produce results that are easier to compare as, typically, there is only one way of completing them. Specific instructions can be used to test the efficiency of a particular interaction.
Cool-down (20% of the time)
The most interesting data is often gathered during the follow-up interview. You should therefore plan sufficient time for this section.
Possible questions are:
1. What is your overall impression of the website/app?
2. Name three key words that immediately come to mind for the website/app.
3. Which three features did you like most about this website/app and which three did you like the least?
4. Would you use this website/app in future? If yes, why? Or, why not?
5. Would you recommend this website/app to friends or colleagues?
6. Do you have any questions or comments?
Recruit test users
Recruiting the right people for the test can take a lot of time and shouldn’t be underestimated. To keep the cancellation rate as low as possible, the recruiting phase should be conducted close to the test date (at most three or four days in advance). Cancellations should be factored in from the start. This means that more than the required number of test users should be recruited. People who carry out recruiting themselves should plan sufficient time for screening the right test users and briefing them prior to the test.
Recruiting sources
- Internal user databases
- Social media such as Facebook, Twitter and Google+
- RonOrp
- Newsletters
- Your own website
Outsourcing recruitment
- www.testingtime.com
- Market research agencies such as Intervista
Selection
To produce meaningful and valuable data with a user test, when recruiting test users it is important to make sure that they are a good fit for the particular target group (persona). In addition, you should always aim for a balanced mix of test users to prevent one-sided results. (For example, not just men or young people.)
To ensure that usability issues do not go unnoticed due to an existing familiarity with the test object, team members or colleagues with knowledge of the product should potentially be excluded. Family members and friends are likewise not useful test users as they are seldom a match for the desired persona and are biased; they tend to be too positive, which does not produce sufficiently valuable data. Similarly, recruiting random test users is also to be avoided. The responses yielded in such tests must be interpreted with caution. Otherwise, you might make a major decision on the basis of inaccurate test results.
Nevertheless, it is always better to have some results than none at all.
The right number
One of the most debated topics concerning the identification of usability issues is the right number of test users. Conducting several individual tests for one and the same study requires a great investment of time and makes the subsequent evaluation unnecessarily difficult. According to a study by Jakob Nielsen as few as five test users should be sufficient to discover the most critical weaknesses. However, those who value statistically relevant results should reckon with investing more time.
Schedule
A good schedule plans a little breathing space between the individual user tests. A short break of around 30 minutes after each test provides some room for the unexpected and allows a brief exchange among the participants in order to discuss the findings.
Scheduling
To ensure a smooth process and to avoid the late or non-arrival of test users due to poor or lacking information, give all participants in advance the address, a contact name and emergency number to call. Sending out a quick reminder on the morning of the test helps to ensure that the test users remember their appointment.
Participation incentivization
If you recruited the test users yourself, it’s a good idea to give an appropriate reward, either as money or a gift, for their time. This participation incentivization should be given at the end of the user test.
Prepare test location and systems
The room you choose for the test should be quiet and have a pleasant atmosphere. Test users should feel as comfortable as possible in the test environment. If several people want observe the test, it is useful to have a second room available that is out of hearing range of the first. The audience can then follow the test from a screen without disturbing the test user.
Tools
No tools are necessarily required for an in-house user test. However, if a third-party observer would like to follow the test, the screen image can be transmitted over Skype or www.join.me. If the test or individual sequences may require subsequent detailed reevaluation, the test can be recorded using the following tools:
- Screencast-o-matic.com
- Silverbackapp.com (MAC OSX)
- Quick Time Player (MAC OSX)
For mobile prototypes that, for example, are to be tested on a smartphone, the screen can be recorded using an external camera and transmitted to a separate computer.
Specify involved persons and role assignment
Moderator
It makes sense to assign this role to an unbiased party. People too closely involved with the product will tend to defend any identified weaknesses. The moderator sits next to the test user and guides them through the test. During the introduction and through the main section, the moderator alone is responsible for any needed communication. Only after the test are any involved observers permitted to ask questions.
Observer / note taker
To ensure that as much useful data as possible is gathered from the test, one or two people should be employed to record proceedings from the background. This should include metadata such as the test user’s gestures, facial expressions, body language, etc. This allows the moderator to give full attention to the test itself, without having to take additional notes.
Observers
It is often helpful to include members of the project team in the test. These might include clients, designers, project leaders or developers who could benefit from following the test live, thus allowing them to witness any issues firsthand. Involving interested parties in this way minimizes the amount of effort later required to convince others of the results. This group should, if possible, not be present in the testing room so that they do not influence the test users or the testing process. Emotional reactions, even ones as little as a sigh, put test users under unnecessary pressure and increase stress levels.
And it has been shown that test users experience high levels of stress when they are observed by several people. On the other hand, knowing that their responses are being filmed produces less stress.
Carry out dummy run
To ensure that nothing goes wrong during the test itself, a test run with a non-involved person should be carried out. A dummy run helps to identify any problems with the timing, the technical set up and ensure that the instructions are clear to the test user.
Execution
Completing a test under observation can lead to increased stress levels in the test user. To reduce this effect, you should create a comfortable atmosphere. It helps to inform the test user about what is going to take place in the following 30-60 minutes. Any fears they may have had can be eased with this preparatory information.
To express appreciation and avoid giving the impression of a stiff and informal test environment, it helps to offer the test user drinks and snacks.
Introduction (warm up)
At the beginning of the test, the test user should be given a short introduction. It is critical that this introduction points out that it is not the test user who is being tested, but rather the website/app. It is equally important to inform the test user that their feedback will contribute directly to the project team’s ability to improve the product. In other words, the test user is making an important contribution to the optimization of the product.
The test user should be reassured that the results will be used anonymously. If the test is to be recorded in audio and video, the test user’s consent is required in advance. If necessary, the test user can be asked at this point to sign a non-disclosure agreement to prevent the dissemination of any sensitive information.
Important: The test user must be invited to follow the think-aloud protocol during the test. This helps all involved parties to see what is going on in the test user’s head (mental model). If a test user falls silent, the moderator should prompt them to continue voicing their thoughts, for example, by asking them what they are thinking
During the test (main)
The moderator should be as reserved as possible regarding comments or offering assistance. The test user should solve any problems on their own to the greatest extent possible. The moderator should only intervene if a particular task would otherwise go uncompleted.
If the test is being recorded, it helps when the observer notes the precise times of particularly interesting occurrences. This facilitates a speedier analysis of the test later on. It is not advisable to ask the test user for possible solutions or preferences. Apart from the moderator, no one should ask the test user any questions during the test. Observers are asked to wait until the test is completed. The test should not run over the agreed time.
Out of respect, the moderator should refrain from laughing in the rare event that a test user makes odd comments, strange observations or exhibits puzzling behaviour.
Cool-down
The cool-down is particularly useful because as soon as the pressure of the formal user test is over and the test user is relaxed, good feedback can be obtained on the tested product or service. It is therefore advisable to devote 20% of the test time to this section in order to allow observers and test users enough time to ask any questions. A list of possible questions is included in section 1.4.
When there are no further questions to be asked, the test can be concluded by thanking the test user for their time and contribution.
Evaluation and analysis
The data should be evaluated as soon as possible after the test, otherwise you run the risk of forgetting important details. If possible, all involved experts (moderator and observers) should record in writing their first, personal impressions independently of each other. Comparing these impressions later on generates a more neutral evaluation of the whole. It also minimizes the possibility of a problem being overlooked.
Immature features in the prototype and unnatural test settings can cause usability problems that would not occur in natural conditions and when full functionality is present. If the test conditions do not closely represent the product’s natural use environment, this should be taken into consideration in the evaluation. This is an additional difficulty as genuine user problems have to be differentiated from problems related to the testing conditions.
The golden rule:
If the predefined test objective is not accomplished by a majority of test users, there is clearly a usability problem. But if only one test user experienced difficulties, no one should rush to the conclusion that there is a usability problem.
Preparing the data
Potential usability problems can be identified by referencing the videos, observations and notes taken during the test. To ensure that the recorded data can be properly evaluated, it is advisable to conduct the analysis in as structured a manner as possible.
For instance, you could use a spreadsheet in which the following points are made for each identified problem:
1. Task and time
Here you should briefly describe the task and record the exact time at which the problem occurred. A screenshot of the situation illustrates the nature of the problem and provides the context for subsequent discussion. Task 3, shop detail page, box: similar articles
2. Problem
The problem should be recorded as clearly as possible: Was confused, didn’t know whether or not the articles were part of the same offer.
3. Cause
An initial, personal evaluation of the cause: The box is not far enough away from the actual articles.
4. Number of affected test users
A good evaluation should record exactly who and how many test users were affected by the problem. Whether one or all test users experienced the problem is a very important consideration. And whether the affected persons are representative of the target group or only fulfill some of its criteria is highly important when evaluating the problem’s significance. Affected: 4 of 7 test users: 1, 3, 4 and 7
5. Difficulty
This five-point scale can help you assess the difficulty of the problem. This assessment must be made independently of the estimated difficulty of implementing the consequent changes.
0 = Not a usability problem
1 = Cosmetic problem
2 = Minor usability problem
3 = Significant usability problem
4 = Usability disaster
Prioritizing
Finally, the evaluations from the individual experts are compared and discussed. The data is consolidated to prepare a final set of priorities.
Structuring and prioritizing can be established using the following guidelines:
a) Costs and effort needed: How time-intensive is it to resolve the usability problem?
b) Level of improvement: How significantly can the product’s usability be improved?
Combining the cost and level of improvement yields a priority level.
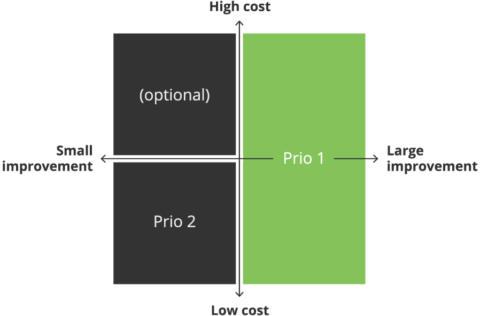
Anything that can lead to a large improvement in the product’s usability always has high priority. However, no project budget can afford to address every single problem. Together with the stakeholders, it must now be decided which improvements should be implemented and with which priority.
Next steps
To ensure that the costs of the user test were worthwhile, the insights gained must now shape the product’s further development. Its next iteration can be planned based on the usability problems identified and their respective priorities.
To make sure that valuable design and development time is not wasted on false assumptions, it makes sense to dedicate two to four weeks for design iterations. It is generally the case that the earlier a problem is identified and resolved, the fewer unpleasant compromises have to be made at the end of the project. This is not only cost-effective; it also leads to increased customer satisfaction.
Download the eBook so you always have a reference work:
Summary
Preparation
- Create a test script with test tasks, hypothesis and objective.
- Explain the context of the test to the test user using a scenario.
- Only recruit people who belong to the target group of the product or service.
- Healthy balance of age and gender.
- 5-7 test users are sufficient for each test.
- Include sufficient breaks between each test.
- Test users must be clearly informed about the time, location and contact information.
- Establish a pleasant test atmosphere.
- Select an unbiased moderator.
- Include at least one observer.
- Observers should not be present in the testing room.
- Carry out dummy run.
Execution
- Give a brief introduction about the test.
- Note: The prototype, not the test user, is being tested.
- Obtain test user’s consent and, if necessary, ask them to sign a non-disclosure agreement.
- Ask test user to think out loud.
- Only intervene if a particular task would otherwise go uncompleted.
- Do not ask suggestive questions.
- Never ask the test user for solutions or preferences.
- Keep to the agreed time.
- Do not laugh at the test user.
- Only the moderator and test user may converse during the test. Observers must wait until the test is completed.
- Plan sufficient time for the cool-down section.
- Allow sufficient time for observers and test users to ask questions.
- Thank the test user for their time and give the agreed incentive.
Analysis and next steps
- Do not wait for long before conducting the evaluation.
- Do not draw any conclusions on the basis of one test user’s statement.
- Make sure the insights gained are incorporated into the product’s further development.
- Conduct regular tests.